Tutorial
Background
Simulation Manager
In order to train Traffic Management Center staff, the TMC simulator's training facility is used to play real-world scenarios that dispatchers could be exposed to. This allows for an immersive learning experience and a way to benchmark the performance of the dispatchers. The simulation manager emulates what actual behavior will be expected in the real-world environment by reading a script and directing students and trainers on evaluation points and typical events that can happen in a real-world dispatch environment. To build the scenarios that are used by the students and trainers, the ScriptBuilder application was developed to enable easy creation, viewing, and editing of the training scenarios.
Creating a scenario
The following is to be used as an example tutorial for creating a scenario from scratch.
Opening the program
To run the ScriptBuilder application, download the application from the DownloadPage, and unzip the given folder. The program can be run by opening the command line at this location and (needs windows cross-check) typing java -jar !ScriptBuilder.jar or double-clicking on the .jar file.
Adding your first Incident to the Scenario
For the first Incident, we're going to add both the Media Log and the Tomato Truck Spill/Fire incidents from the pre-existing incident pool. To do this, navigate to the incidents menu, and select the "Load Incident..." option. This should bring up the Incident Pool Window, similar to the one below:

Press the large "Add" button to the right of the incident you would like to add, in this case the Media Log and Tomato Truck Spill/Fire. When completed, press the "Done" button, which will return you back to the Scenario Overview Window. You should see the two added incidents in the window, as shown below:

Take note that the Media Log does not have any tick marks on its timeline, as it does not contain any events. On the other hand, the Tomato Truck Spill/Fire incident has a long line of tickmarks, which each indicate a time at which an event occurs during the incident (could be more than one).
Modifying the incident properties
To see the properties of the incident, right-click on the timeline and select the properties option as shown below:

A window titled "Incident Properties" should open and the property values will be filled with whatever was saved with the incident itself. Change the incident's color by selecting the dropdown menu and selecting "red" instead.

Upon completion, click "OK" to save the changes, and observe the change in color of the incident in the Scenario Overview Window.
Creating a new incident
Open the incident menu, and select the "New Incident..." option. An Incident Properties window should appear, which will already have the next available incident number filled in, which in this case is 101. Change the color to Yellow, name it "An accident", and set the start time to 10 minutes.

The Incident Editor window will appear without any incidents.
Adding your first event
Add a Witness event to the incident timeline by selecting the button named "Witness" and click anywhere to add the event to the timeline. A popup notifying that the event will be added to the beginning of the incident will appear, and after confirming, the Event Editor Window will appear. Fill it in to match the image below:

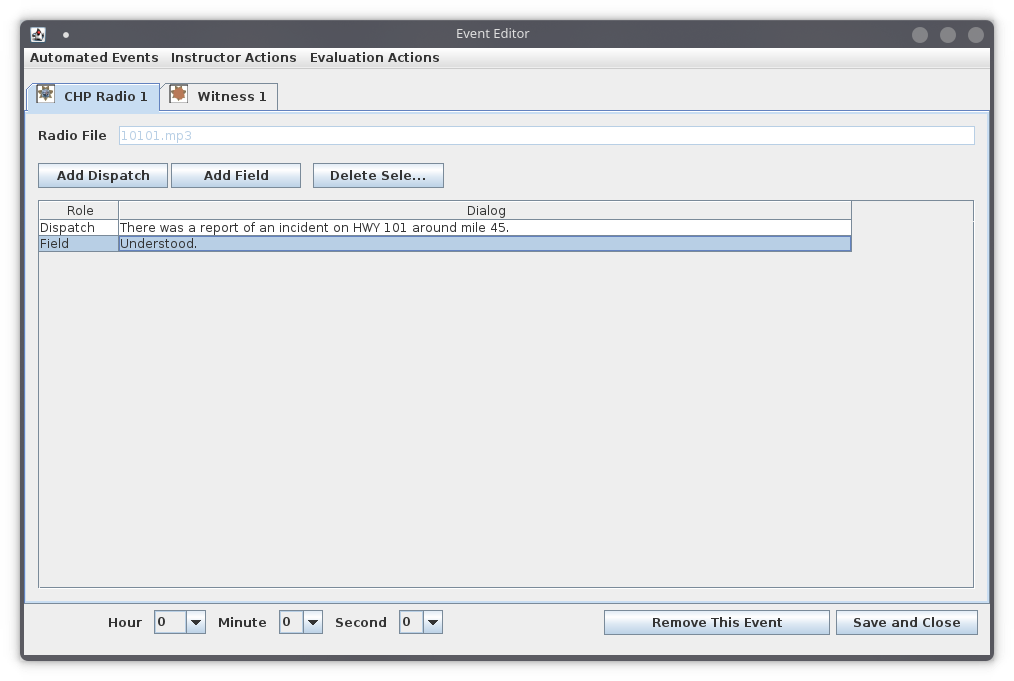
Before closing the Event Editor Window, add another event a CHP Radio Event to the incident by clicking on the dropdown menu in the Event Editor Window titled "Automated Events", and click on the CHP Radio button to add it. Fill in the information as below and save and close the Event Editor Window.

The Incident overview window appears as follows: (notice that there was an Audio Event added by the builder to correspond with the CHP Radio Event)

Add in a unit event at 5 minutes by selecting Unit and mousing over to where the tooltip on the mouse reads 5 minutes. Place the event and a new Event Editor
should open. Select unit 9-9 from the dropdown and save and close the Event Editor Window.
Adding extra time to the Incident
Add 15 minutes to the end of the script by going to the top-right corner of the Incident Editor Window and ensuring the "to end" is selected, and clicking on the +15 button. This will add 15 minutes to the end of the script and allow you to add events further along. Add a Tow event at 17:40 and fill it with the values shown in the image below:

Fixing/Modifying mistakes in the Incident
Oh no! It looks like we accidentally put the unit event at 5:00 instead of 5:40 and selected the wrong unit! That's no problem to move... Just click on the unit event and, on the bottom of the window, change the seconds dropdown to be 40 instead of 0. Change the unit to 14-9 in the Unit selector dropdown, save and close the window, and the Unit event will move to the correct position. From time 0 with the zoom all the way out, the Incident Editor Window should look like this:

Adding/Removing time from the middle of an Incident
If extra time needs to be inserted or removed from an Incident, there is a tool that can be used to enable easy addition of time to the middle of the timeline. To use this tool, while you have none of the event types selected (press "Esc" to ensure you do not have any selected), right-click anywhere there is not an incident on the timeline. You should see a popup similar to the one displayed below:

Selecting the "Add time here" option pulls up an input window where you are able to add a specified amount of time, which gets automatically rounded down to the nearest 20 seconds. For example, if you try to insert 10 seconds to the timeline, 0 seconds will be inserted. If you add 20 seconds instead, there will be 20 seconds added into the timeline. This functionality works similarly with the "Remove time here" feature.
Now, move the unit event back to 5:00, this time using the remove time feature. Your final [ScriptBuilder_ReferenceManual#IncidentEditorWindow?|Incident Editor Window]] should look like this:

Saving your Scenario
Now that you have a Scenario that has two separate Incidents and one Media Log, it's ready to be saved. Navigate to Scenarios->Save to open the save window. When saving your incident, make sure there are no other incidents in the same directory. To ensure this, create a new folder in the save window and enter it to save your scenario. Once entered, click the "Save" button to save your changes. In your files, you should see the XML script created, and a folder named Audio. This folder contains all of the transcripts created in the ScriptBuilder? that need to have audio recorded. Each incident has their respective folder to contain all of the audio recordings or text transcripts that are needed to create the audio recordings.
Opening an existing scenario
To open an already-existing scenario, use the Scenarios->Open... feature. A file selector should open pointing to your home directory. From there, navigate to your existing scenario file, which should be in its own subdirectory with an Audio folder.
As an example, close the window that you were already working on, and re-open the same Scenario.
INCOMPLETE
Script Builder tutorial OUTLINE THIS IS FOR TUTORIAL - REFERENCE GUIDE IS FOR LATER
Background
Prerequisites: What the Simulation Manager does. How an incident script is structured. Major script builder features.
Overview Window
Stage 1|
Creating a new Incident
Incident Properties Dialog Incident Editor Window The Timeline Adding the first event
Stage 1.5|
Event Editor Window Adding more events Revising an Event Changing an event's time
Stage 2|
Modifying an Incident's timeline
Add time to start or endAdd or remove time from middle
Saving a Scenario
Opening an existing Scenario
Incident Pool Concept
Loading an Incident from the Incident Pool
Incident Pool Window
Stage 3|
Saving a single Incident
This saves WITHOUT units, is that correct? (YES) Explain implication: won't run properly in Sim Mgr.
Loading Additional Units
How default units are used. Why additional units may be needed.
Stage 4|
Attachments
-
TWO_EVENT_MAIN_POPULATED.png
 (25.2 KB) -
added by sdanthin 5 years ago.
(25.2 KB) -
added by sdanthin 5 years ago.
-
INCIDENT_PROPERTIES_DROPDOWN.png
(41.0 KB) -
added by sdanthin 5 years ago.
-
INCIDENT_PROPERTIES_COLOR.png
(45.9 KB) -
added by sdanthin 5 years ago.
-
INCIDENT_PROPERTIES_NEW_INCIDENT.png
(32.6 KB) -
added by sdanthin 5 years ago.
-
WITNESS_JOHN_DOE.png
(47.7 KB) -
added by sdanthin 5 years ago.
-
CHP_RADIO_EDITOR_JOHN_DOE.png
(51.3 KB) -
added by sdanthin 5 years ago.
-
INCIDENT_EDITOR_THREE_EVENT.png
(65.0 KB) -
added by sdanthin 5 years ago.
-
TOW_EVENT_DATA.png
(47.8 KB) -
added by sdanthin 5 years ago.
-
INCIDENT_EDITOR_UNIT_SHIFTED.png
(65.4 KB) -
added by sdanthin 5 years ago.
-
INSERT_TIME_INCIDENT_EDITOR.png
(68.1 KB) -
added by sdanthin 5 years ago.
-
UNIT_EVENT_MOVED_BACK.png
(69.3 KB) -
added by sdanthin 5 years ago.